The history of laced shoes dates back to ancient times. The earliest known example of laced footwear is a pair of sandals discovered in Fort Rock Cave in Oregon, dating back to around 9,000 years ago. These sandals were made from animal hide and were secured to the foot with a simple lacing system.
In ancient Egypt, laced sandals were worn by both men and women. These sandals were made from woven reeds, papyrus, and leather. The lacing system used on these sandals was a simple criss-cross pattern, being a good example of how to lace Shoes so they slip on .
In ancient Greece, laced sandals known as “cothurni” were worn by actors on stage. These sandals had thick soles and were laced up to the calf with leather straps.
During the Middle Ages in Europe, laced shoes became popular for both men and women. These shoes were made from leather and were often embellished with embroidery and other decorative elements.
In the 17th century, the use of buckles on shoes became popular. However, laced shoes remained in use, particularly for practical purposes such as for soldiers and laborers.
During the 19th century, laced shoes became more widely available to the general public thanks to the industrial revolution. Advances in machinery made it possible to mass-produce shoes, including laced shoes.
In the early 20th century, laced shoes underwent a major design change with the introduction of the “oxford” style. This style features a closed lacing system, where the eyelets are located on the underside of the vamp (the part of the shoe that covers the toes). The oxford style quickly became popular for both men and women and is still in use today.
In the mid-20th century, sneakers (also known as trainers or athletic shoes) became popular, and many of these shoes used laces as a way to secure the shoe to the foot. The design of laces on sneakers has evolved over time, with many shoes now featuring stretchy or elastic laces that don’t require tying.
Today, laced shoes come in a wide variety of styles, from dress shoes to sneakers to hiking boots. Laces are often used as a way to customize the fit of the shoe to the wearer’s foot, and many people enjoy experimenting with different lacing patterns to achieve the perfect fit and look.
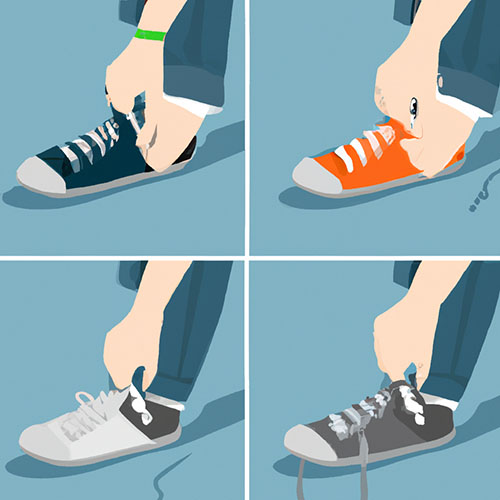
Following we show you different method on how to lace shoes so they slip on
Heel Lock Lacing
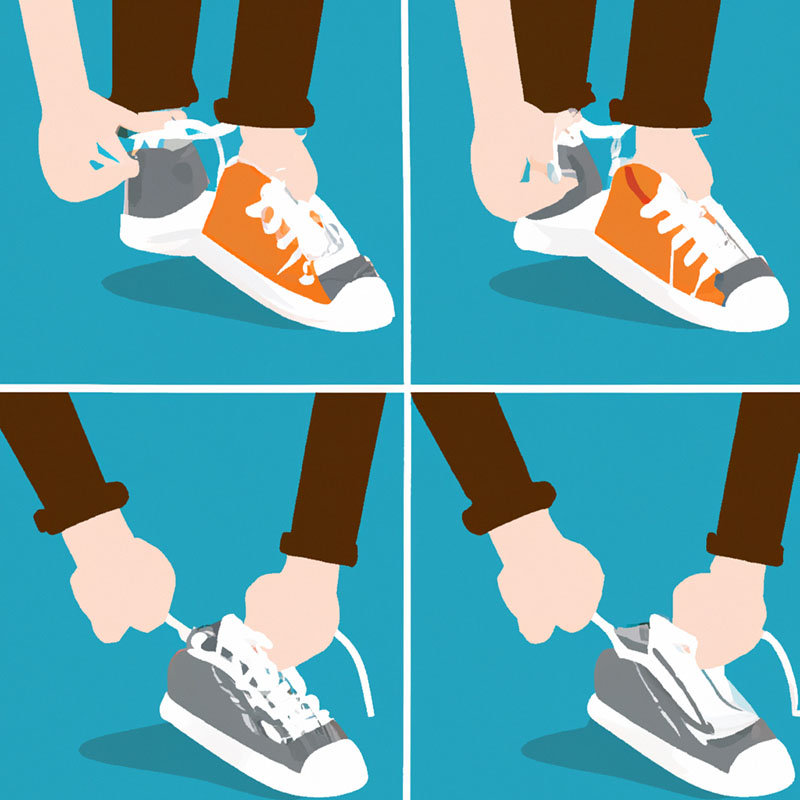
Lacing shoes so that they slip on can be achieved by using a technique called “heel lock lacing”. This method involves creating a loop around the ankle that keeps the heel in place and prevents it from slipping out of the shoe.
Here are the steps to lace shoes with the heel lock technique:
Start by inserting the shoelace into the bottom eyelets of the shoe, making sure that both ends are of equal length.
Take the right lace and thread it through the next eyelet on the same side, then repeat with the left lace.
Cross the laces over each other and thread them through the opposite eyelets. For example, the right lace should be threaded through the left eyelet, and the left lace should be threaded through the right eyelet.
Take the ends of the laces and tie them together in a basic knot, making sure that the laces are snug but not too tight.
Next, create a loop with the right lace and hold it with your thumb and forefinger. Take the left lace and thread it through the loop, pulling it tight so that it creates a knot around the loop.
Create a similar loop on the left side by making a loop with the left lace and holding it with your thumb and forefinger. Thread the right lace through the loop and pull it tight.
Take the right lace and thread it under the loop on the left side, then bring it up and thread it through the loop on the right side. Pull the lace tight to create a knot.
Repeat the previous step with the left lace, threading it under the loop on the right side and up through the loop on the left side.
Finally, tie the laces together in a bow as you normally would.
By using the heel lock lacing technique, you can create a snug and secure fit that will keep your shoes from slipping off your feet.
Over-Under Lacing
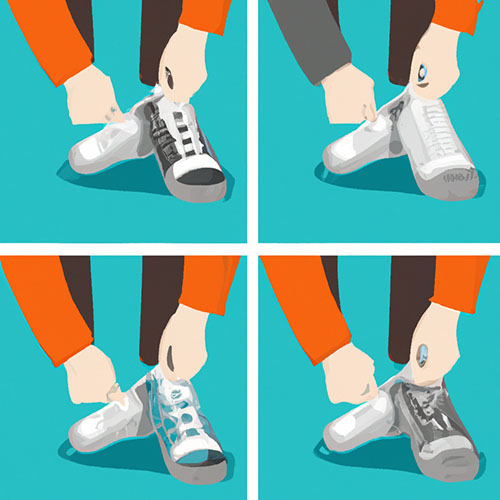
This method involves threading the lace over one eyelet and under the next, alternating all the way up the shoe. The result is a lacing pattern that creates a series of loops that you can use to easily slip your foot in and out of the shoe.
Begin by threading the lace through the bottom eyelets of the shoe, starting on one side and ending on the other.
Take the lace on one side of the shoe and thread it over the next eyelet on that same side.
Then, take the same lace and thread it under the eyelet on the opposite side of the shoe.Repeat steps 2 and 3, alternating sides as you go up the shoe. Each time, you’ll be threading the lace over one eyelet on one side, then under the next eyelet on the other side.
When you reach the top of the shoe, tie the laces together in a basic knot or bow.
The result is a lacing pattern that creates a series of loops that can be easily pulled open to slip your foot in and out of the shoe. To tighten the shoe, simply pull the laces to close the loops.
There are a few variations of the over-under lacing method that you can try:
Straight Bar Lacing: This variation involves lacing the shoes straight across, with no diagonal lines. Simply alternate threading the lace over and under each eyelet, creating a series of horizontal lines.
Diagonal Lacing: With this variation, you’ll lace the shoes diagonally, creating a series of diagonal lines that criss-cross over the top of the foot. Start by threading the lace over one eyelet on one side, then under the next eyelet on the opposite side. Continue this pattern all the way up the shoe, creating diagonal lines that cross over the foot.
The over-under lacing method is a great choice for slip-on shoes, as it creates a series of loops that can be easily opened and closed to adjust the fit of the shoe. It also adds a stylish touch to your footwear!
Skip Lacing
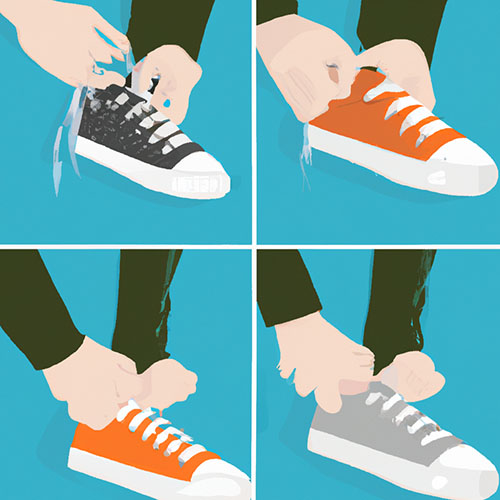
With this method, you skip every other eyelet when lacing your shoes. This creates wider gaps between the laces, allowing you to easily slip your foot in and out of the shoe. You can adjust the tension of the laces by tying the knot tighter or looser.
Here are the steps to use the skip lacing method:
Begin by threading the lace through the bottom eyelets of the shoe, starting on one side and ending on the other.
Skip the second eyelet on each side of the shoe, and thread the lace through the third eyelet on one side, then the third eyelet on the other side.
Continue skipping every other eyelet as you lace up the shoe, threading the lace through the third, fifth, seventh, and so on.
When you reach the top of the shoe, tie the laces together in a basic knot or bow.
The result is a lacing pattern that creates wider gaps between the laces, allowing you to easily slip your foot in and out of the shoe. To tighten the shoe, simply pull the laces tighter and tie them in a knot or bow.
The skip lacing method is a great option for shoes that you want to wear as slip-ons, such as sneakers or casual shoes. It’s also a good choice if you have difficulty with traditional lacing methods or have mobility issues that make it hard to tie your shoes.
One variation of the skip lacing method is the “half skip lacing” method, which involves skipping every other eyelet starting at the second eyelet, rather than the first. This creates a slightly different look, with the gaps between the laces starting slightly higher up on the shoe.
Overall, the skip lacing method is a simple and effective way to lace shoes so that they slip on easily, making them a great choice for those who want a more convenient and comfortable way to wear their shoes.
Double Back Lacing
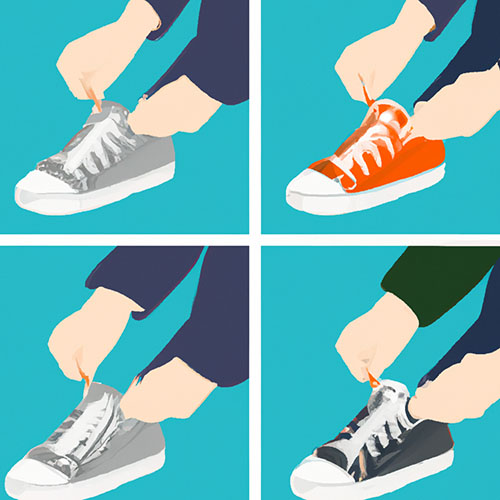
This method involves threading the laces through each eyelet twice, creating a more secure fit that can still be easily slipped on and off. Start by threading the lace through the bottom eyelet on one side of the shoe, then double back and thread it through the next eyelet up on the opposite side. Continue this pattern all the way up the shoe, tying the laces together at the top.
Double back lacing is a unique and stylish way of lacing shoes that involves a criss-cross pattern with an additional loop at the bottom that runs back through the top eyelets. This creates a distinctive double line effect that can make your shoes stand out from the crowd.
To create the double back lacing effect, follow these steps:
Begin by lacing your shoes using the standard criss-cross pattern, starting at the bottom eyelets and working your way up to the top.
Once you reach the top eyelets, take the lace and loop it back down through the second-to-last eyelet on the same side, creating a new loop.
Take the lace and cross it over to the opposite side, threading it through the second-to-last eyelet on that side.
Bring the lace back over to the original side and thread it through the loop you created in step 2.
Take the lace and bring it across to the opposite side again, threading it through the loop you created in step 3.
Repeat steps 2-5 until you reach the bottom eyelets, tying the laces in a knot or bow when you’re done.
When completed correctly, the double back lacing pattern should create a unique and eye-catching look for your shoes. It’s important to note that this lacing style may require longer laces than standard lacing methods due to the additional loops and crosses involved.
Double back lacing is also known as “Double Helix Lacing” or “Double Lattice Lacing”.
Elastic Lacing
Elastic laces are another option that can make it easy to slip your shoes on and off. Instead of traditional laces, these laces are made of elastic material that stretches to fit your foot. They can be adjusted to your desired level of tightness, and can be easily replaced if they become worn or damaged.
Remember, the method you choose will depend on your personal preference and the type of shoe you are lacing. Try out a few different methods to find the one that works best for you!
Elastic lacing, also known as “no-tie lacing”, is a convenient and easy-to-use alternative to traditional shoelaces that uses stretchy elastic cords instead of regular laces. Elastic laces are particularly useful for people who have difficulty tying or untying shoelaces, such as children or people with disabilities, or for anyone who wants to save time and hassle when putting on and taking off their shoes.
To use elastic laces, follow these steps:
Begin by threading the elastic laces through the eyelets of your shoes, as you would with regular laces. Make sure the laces are evenly spaced and that they are not twisted or tangled.
Pull the laces tight to your desired level of tightness, making sure they are snug but not too tight. You can adjust the tightness by pulling on the laces and/or the locking mechanism.
Once you have the desired tightness, use the locking mechanism to secure the laces in place. This may involve a variety of different mechanisms, such as sliding toggles, push-button locks, or snap locks. Make sure the mechanism is securely fastened and that the laces are not likely to come loose during use.
Repeat the process with the other shoe, and you’re ready to go!
One of the benefits of elastic lacing is that it allows for a custom fit that can be easily adjusted throughout the day as your feet swell or your shoes loosen. The elastic material also allows for more flexibility and movement than traditional laces, which can be especially useful for athletes or anyone who needs to move quickly and easily.
Elastic lacing comes in a variety of styles, colors, and materials, and can be found in most shoe stores or online. Some popular brands of elastic laces include Lock Laces, Xpand Laces, and HICKIES.
Wrapping app!
Summarizing as we have seen there are a few different methods to learn on how to lace shoes so they slip on. The basic idea is to lace the shoes in a way that allows you to slip your foot in and out without having to untie or adjust the laces each time. One of the common method is to use elastic or stretchy laces, which can be laced up like normal laces but provide more give and flexibility when putting the shoes on and taking them off. Another method is to use a “hidden knot” technique, where you tie the laces in a knot at the base of the tongue or on the inside of the shoe, leaving enough slack to allow the shoe to slip on and off easily. Some people also experiment with different lacing patterns, such as skipping eyelets or lacing the shoes diagonally, to achieve a looser fit that allows for easier slip-on.
- Best Casual Shoes For Motorcycle Riding - May 29, 2024
- Best Shoes For Morton’s Neuroma - April 3, 2024
- Best Diabetic Shoes For Women - February 3, 2024